Printers Help and Repair

Showing posts with label and. Show all posts

Saturday, November 23, 2019

no image

How to Read and Copy EEPROM Data from Epson Printers

How to Read and Copy EEPRsaya Data from Epson Printers

A. EEPRsaya data read

This function is to read all of EEPRsaya data and save read data to file. Procedure to read EEPRsaya data, Click the Read button to read all of EEPRsaya data.

B. EEPRsaya data copy (Backup EEPRsaya)

Before you replacing the main board, this function should be done to save all of necessary parameters from target (defective) main board by pressing “Backup” button. If the program detects all read parameters are correct, then you can replace the main board with new one. After that, you can restore all of read parameters onto replaced new main board by Restore button. If this function successes, some of later adjustments may be omitted such as heat protection.

Conditions : Before replacing the main board with new one.

How to Backup EEPRsaya data (Adjustment procedure)

  • Click the backup button to backup the old main board data.

When the backup operation is succeeded,
  • Replace the main board with new one.
  • Turn on the printer and click the restore button.
  • When the restore operation is succeeded, perform necessary adjustment.
When the backup operation is failed, Perform necessary adjustment.

Tuesday, March 5, 2019

Filling and Refilling Epson T0781 T0786 refillable ink jet cartridges

Filling and Refilling Epson T0781 T0786 refillable ink jet cartridges

Our how-to guide shows the easy fill process of the T0781, T0782, T0783, T0784, T0785 & T0786 ink jet cartridges. Also covers information about the ARC (auto-reset chips) and refilling information.Instructions on Filling & Refilling Epson Compatible T781, T0782, T0783, T0784, T0785 & T0786 ink jet cartridges with ARC (auto-reset chips).

The refillable cartridges for T0781, T0782, T0783, T0784, T0785 & T0786 contain an auto-reset chip. Once ink level falls to a predetermined level the chip automatically resets to near full capacity.Cartridges have a 10+ml capacity per cartridge.

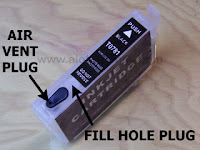
These cartridges are of a 2 plug design, but not pressure filled as previous 2P cartridges were.One plug is used as a fill hole while the other is a vent plug. The image on the right shows the two plug locations.

Filling & Refilling:

  • Remove clear rubber fill hole plug

  • Fill injector with desired color ink.

  • Insert injector needle into cartridge

  • Slowly inject ink. Make sure you do not push needle all the way to the hub (yellow plastic portion of needle.) Inject ink slowly

  • When completed injecting ink replace original clear fill hole plug.

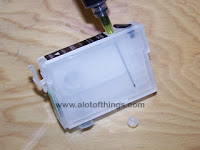
That is it. Cartridge has now been filled and is ready for use.Though the image to the right shows the cartridge laying on it side this is not recommended. It was taken this way to show the ink in the cartridge. Always keep cartridge upright.

Before attempting to use any cartridge make sure you have ALL cartridges filled.Cartridges do not work independently. The printer will show an error message of only one - five refillable cartridges are installed.

Replace any cartridges already in the printer with a complete set of refillable cartridges.
Once all cartridge have been inserted remove the vent hole plug from the cartridge.The vent hole plug is the color plug. On the image to the right the two leftmost cartridge plugs have been removed.

After removing all six plugs hit the ink cartridge button.Printer will begin to run an initial cartridge prime, the same as when any new cartridge is installed.After prime has been completed run a print test.

IMPORTANT INFORMATION

As with the OEM cartridges, refillable cartridges may not appear on the Epson Print Status window at all times. (image on right). If you open your printer properties window you can see the current status of the ink levels.(image on left of picture). This usually only occurs when running multiple print job without breaks in between.

Once a break in the print occurs your ink level will appear in the Print Status window once again.The ink level not appearing in the Status window is not an aftermarket related issue, but a printer related issue. This occurs on both OEM cartridges as well as aftermarket.

Never install less than 6 refillable cartridges at one time. Printer will not recognize the Epson cartridges when one of the refillable are installed.

Cartridge Chip auto-reset

These cartridges will reset automatically. There is no hitting cartridge change button or turning printer on and off required. Cartridge will all auto-reset at same time. It is advised that all cartridges be refilled at this time to prevent any cartridge running out of ink.Some cartridge may contain a good deal more ink than others depending on the first cartridge that requires reset. In most cases this is black. (under testing of 5 sets using of cartridges on 1 each R260, R380 & RX580).

Refilling

After initial fill when you are ready to refill return allplugs back to cartridge. Remove cartridges from printer and repeat fill process. There is no difference in refill from the initial fill.

Friday, March 1, 2019

no image

How to Reset Canon i255 and i320 Waste Ink Counter

Reset Methode for Canon Printers i255, i320

Step 1 : Manual for service mode
  1. Unplug power and USB.
  2. Open door and hold power button.
  3. Connect power.
  4. Close door, then release power button.
or try other step for manual service mode
  1. Turn off the printer. And disconnect the printer cable.
  2. Press and hold the POWER button, turn on the printer.
  3. The indicator LED should be green.
  4. Press and release the RESUME button , the indicator LED should be orange.
  5. Press and release the RESUME button again, the indicator LED should be green.
  6. Release both buttons.

Step 2 : Software for Permanent
  1. Reconnect the printer cable.
  2. Download and Run General Tools software resetter for Canon printers i320, i255 then
  3. Select USB PORT
  4. Choose SET DESTINATION 1 And it should be reset.
Remark “After service mode use software for permanent reset”

Monday, February 25, 2019

How to Reset Canon iP1200 iP1600 and iP2200

How to Reset Canon iP1200 iP1600 and iP2200

Resetter Canon iP1200, iP1600, iP2200

How to Reset Canon iP1200, iP1600 and iP2200
  1. Download software for Canon Pixma iP1200, iP1600, 2200 Printers from download link above.
  2. Extrac downloaded file by extracded software like WinZip, 7Zip, Izarc, etc.but I recommend to use 7zip, because this software free and usefull and support many compresion format,
  3. Goto extracted folder and then this tool by clicking GeneralTool.exe file
  4. Select the connected USB port number from USB PORT where your printer installed.
  5. Click LOCK RELEASE, and select the applicable model name printer in SET DESTINATION section. there are four choice there that is iP2200E, ip2200j, ip1600e, ip1200e . corresponding to your printer
  6. To reset waste ink counter In CLEAR WASTE INK COUNTER section, select MAIN or PLATEN. The selected waste ink counter will be reset. MAIN resets the main waste ink counter, PLATEN resets the platen waste ink counter. If both the main and platen waste ink absorbers are replaced, reset both the main and platen waste ink counters.
DOWNLOAD Service Tool Software for Canon Pixma Printer iP1200, iP1600, iP2200

Saturday, February 23, 2019

no image

WSD Scanning and Printing

WSD (Web Service on Devices) was introduced in windows vista. It supports printing and scanning and is available in several new multifunction machines. In this article we are going to learn how to WSD scan and print in windows7.
Go to Control panel.
Open Hardware and Sound
Click "Add a device" under "Devices and Printers".
Windows will automatically search for WSD devices, select the desired device and complete the next few steps to complete the installation.
It will also create a WSD port to use for printing also. Open "Add a Device" dialogue box, click "Add a printer", select "Add a Local Printer", Choose "WSD port" under "Use an existing port" drop down menu. Complete the wizard and your printer is ready to use.

Sunday, February 17, 2019

no image

How to Reset Canon Pixma iP1200 iP1600 and iP2200

Canon Pixma iP1200, iP1600, iP2200 Resetter
  1. Download software for Canon iP1200, iP1600, 2200 Printers.
  2. Unzip downloaded file by WinZip, 7Zip, Izarc, etc
  3. Run GeneralTool.exe
  4. Select the connected USB port number from USB PORT
  5. Click LOCK RELEASE, and select the applicable model name in SET DESTINATION
  6. In CLEAR WASTE INK COUNTER, select MAIN or PLATEN. The selected waste ink counter will be reset. MAIN resets the main waste ink counter, PLATEN resets the platen waste ink counter.
If both the main and platen waste ink absorbers are replaced, reset both the main and platen waste ink counters.

Download Service Tool Software for Canon Pixma Printer iP1200, iP1600, iP2200
no image

How to Reset Ink Level Cartridges PG 40 and CL 41 in Canon Pixma iP 1880

When refilling ink of cartridge PG-40 and CL-41 at Canon Printer Pixma iP 1880, ink level at cartridge do not become automatic full, but we have to do reset manual otherwise you change new PG-40 and CL-41 cartridges, you needn’t reset the cartridges.

There are some ways to reset of type Canon printers cartridge PG-40 and CL-41, one of the way to reset ink level cartridges PG-40 and CL-41, shall be as follows. Before you do reset you have to provide one of Canon Printers Cartridge PG-40 and CL-41 again.

Resetting level ink :
  1. Tide of Cartridge Canon PG-40 and CL-41 (2nd) to Canon Printer Pixma iP1880 and let the cartridge detect untill finish. And try to test print.
  2. After refill of cartidge canon PG-40 and CL-41 (1st), tide the cartidge PG-40 and CL-41 (1st) at printer and try test print again, usually the ink level status have full again. Otherwise succeed to try again.
Note :
Let easierly of first Canon Cartridges PG-40 and CL-41 i give the name (1st), and other Canon Cartidges PG-40 and CL-41 I give name (2nd).

Saturday, February 16, 2019

no image

Kit repair Lexmark Maintenance and Printer Count Reset

Lexmark Optra laser printers, Hewlett Packard and other brands require regular maintenance kit replacement at a set interval of pages printed. Lexmark printer maintenance service kits started with the Optra S models back in the 90’s and now most mid-range Lexmark printers and up require service kits around the 150,000 to 250,000 page count mark. The exact page count that causes the “need maintenance” error varies so check your user manual.

Please refer to the following to help you reset the need maintenance kit service call once the kit is installed. If you plan to use a printer service repair technician then he/she will take care of clearing the code.

Lexmark Optra S or SE models maintenance kit repair code reset procedure :

* As you power on the printer hold the GO and RETURN keys.
* Hold down until you see “Performing Self Test”.
* Now you will have access to the “Diagnostics Menu” (may display “80 Schedule Maintenance”.
* Press the GO button to bypass the message and get in to the diagnostics mode.
* Use the up arrows and go to the “Printer Setup” menu and press SELECT button.
* Use the arrow keys again to go to the “Reset Maintenance Count”.
* Press SELECT. You are done!


Optra T610, 612, 614, 614 and Lexmark T520/522, T620. T622, T630, T630 and T634 printer maintenance repair reset :

* As you power on the printer hold the GO and RETURN keys.
* Hold down until you see “Performing Self Test”.
* Now you will have access to the “Diagnostics Menu” (may display “80 Schedule Maintenance”.
* Press the GO button to get to the Configuration Menu.
* Press the MENU until you see “Reset Main Cnt” on the Lexmark printer LCD screen and press SELECT button. It should read “Reset Main Cnt” and the second line “Reset”.
* Now press SELECT button. To exit power off and back on the Lexmark laser printer.


Lexmark T640, T642 and T644 laser printer service maintenance kit reset :

* While you power up the Lexmark laser printer press the Hold down the CHECKMARK and RIGHT ARROW button.
* Once you see “Performing Self Test” release the button, you should see “Config Menu on the Lexmark printer.
* Now to reset the Lexmark repair service code use the down arrow key until you see “Reset Main Cnt” and press CHECKMARK button.
* When you see “Reset” press the CHECKMARK button again on the Lexmark printer to cancel the repair maintenance error code.
* Now just power off and on the printer.

Friday, February 15, 2019

no image

How to Reset Canon Pixma MP110 and MP130

How to Reset Canon Pixma MP110 and MP130

Try this methode to reset Canon Pixma MP110 and MP130 printers

Resetting overflow error code for Printer Canon Pixma MP110 :
  1. Turn on the printer.
  2. Click Menu, and then Scan, Copy and Scan again. All – entered the service mode.
  3. Select Counter
  4. Click Copy – everything. Waste dropped to zero.
  5. Turn off the printer POWER button.

Reset Canon Pixma MP130 Printer
  1. Turn on the printer.
  2. Press the MENU key, and then SCAN, COPY and SCAN again – entered the service mode.
  3. Select NVRAM ACCESS further OK.
  4. Select SET ABS-M LEVEL and set value equal to zero.
  5. Select SET ABS-R LEVEL (if any) and is set to zero.
  6. Turn off the printer POWER button.
no image

HP Laserjet 8000 8100 and 8150 Series service mode

1. Hold down SELECT and JOB CANCEL while powering on the printer, until all lights are illuminated and the Display is blank. (If the Display Panel reads INTERNAL TEST at this point, the keys were released too soon. Repeat this step until successful.)
2. Press MENU, then SELECT. The message SERVICE MODE is displayed briefly, then the printer automatically begins an INTERNAL TEST. After several seconds, both Control Panel Indicators turn off. (The printer may display WARMING UP if it has not warmed up completely.) After the printer has warmed up and passed the self test, SERVICE MODE is displayed.
3. Press MENU once to display SERVICE MENU.
4. Once it says SERVICE MENU press ITEM to scroll through service mode items.
To exit the Service Mode press GO.

Tuesday, February 12, 2019

no image

Tools resetter Epson T11 and other

Software resetter for Epson S20, Epson T10, Epson T11, Epson T20, Epson T26, Epson T30 and Epson TX600FW. This reseter exclusive can fix fucking job on epson machine caused by Wilderness ink pad inundated.This exhibit edition has limitation of use exclusive 3 present to reset the furniture and exclusive adjust at 99% assumption. the machine can create only at constricted publication (only 1% remaining pad to orotund procedure). The Good and Appraise writing can correct to 0% of calculator.

This is Chenopodiaceae writing of package and maybe not fully use for few method environtment. You can judge this demonstrate on your scheme, if its manipulate normally, you can acquire the Plangent or Reckon edition. If any job become, satisfy let me jazz. This curriculum was investigating and apply on Windows XP and W2k.

Download deme writing software resetter for Epson S20, Epson T10, Epson T11, Epson T20, Epson T26, Epson T30 and Epson TX600FW download
no image

How to Reset Canon iP1880 IP 1100 iP1800 and iP2500 series

This tutorial solutions to reset canon iP 1880 or canon iP1800 series and work also in canon pixma iP1100, canon pixma iP2500. before reset using general tools you must reset the printer hardware. This way cannot to change ink level status canon pixma iP1880. following tutorial and software resetter to reset Canon Pixma iP1880.

Step 1: Reset hardware
  1. Press Resume button hold for 1 – 2 minutes
  2. Open the cover
  3. Release the catridge and then put catridge again
  4. Close The Cover
  5. Turn Off
  6. Then Turn On again

Step 2: Reset Software using general tools
  • Download software resetter or general tools for canon pixma iP1880
  • Driver should have been install correcly.
  • Connect USB cable.
  • Before connect power, press and hold power button then connect the power.
  • At the same time Hold power button, and press reject button for 2 times then release power button.
  • Run software resetter for canon iP1880.
  • Don’t forget to open lock release in the software. ( note : to view locK release menu, min resolution 1024 x 728)
  • Then select Set Destination to iP1880
  • Check CLEANING and EEPROM CLEAR
  • Click MAIN and PLATEN
  • Finally test print by click TEST PATTERN1.

Note : for permanent reset waste ink canon iP1880 Printers pls, resetting use software resetter. Above way can be used at canon IP 1100, iP1800 and iP2500 series

Download
service tool for Canon iP1880

Friday, February 8, 2019

Reset Waste Ink Canon i320 and i255

Reset Waste Ink Canon i320 and i255

https://blogger.googleusercontent.com/img/b/R29vZ2xl/AVvXsEjGFA9m2C_oT9ZcBA4JXlv2hD6QGvepPHe5jtaYGR80GCvOOsnQB0XMDBGHNNzrZRcsDprnOJyeYNZmqH91WNQZwKpT_m6aaDdb6E9OoKHipLGPKT_-xGYtBD6DSuwsdtcgGUrla_2AAP4/s320/Canon+i320.jpgStep 1
Manual Temporary

1. Unplug power and USBOpen door and hold power buttonConnect power
2. Close door, then release power button.

or Step

1. Turn off the printer. And disconnect the printer cable
2. Press and hold the POWER button, turn on the printer
3. The indicator (L.E.D.) should be green
4. Press and release the RESUME button , the indicator (L.E.D.) should be orange
5. Press and release the RESUME button again, the indicator (L.E.D.) should be green
6. Release both buttons.

Step 2 Software for Permanant

1. Reconnect the printer cable.
2. Open General Tools software and select (USB PORT)
3. Choose (SET DESTINATION 1) And it should be reset.

Remark “After service mode Pls use software