Printers Help and Repair

Showing posts with label ink. Show all posts

Monday, November 11, 2019

no image

Reset Waste Ink Counter Epson Stylus Photo RX640 Using Software Resetter

Software can be used to reset Epson Stylus Photo RX640 there is two. You can use adjutment program for Epson Stylus Photo RX640 or using SSC service utility, because sscserve v 4.30 support this printer.
Resetting Using Adjustment Program Epson Stylus Photo RX640
Important, before run adjustment program for Epson Stylus Photo RX640, aler date setting in the pc to 23 januari 2007. Date setting is needed to run adjustment program for Epson Stylus Photo RX640 without error.

  • Download and run adjutment program for Epson Stylus Photo RX640 by clicking AdjProg.exe and then Select particular adjustment mode.

  • Select usb port where printer Epson Stylus Photo RX640 installed

  • Select waste ink pad counter then click Ok
  • Click initialization button and the Epson Stylus Photo RX640 should be reset
Resetting Using SSC Service Utility
  • Download and install SSCServe.
  • Run SSC Service Utility and change the seting to rx640 and then close the windows setting.
  • Right click SSC Service Utility icon in the systay to view the menu.
  • Select protection counter and then select reset protection counter to reset the counter become zero.
Note : after resetting the printer turn off the printer and turn on again.

Monday, March 18, 2019

no image

Epson Stylus Pro 4000 Waste Ink Counter Reset

     While Powering up the printer, hold down the the left arrow, down arrow, and Up arrow buttons
    You will get a “Self Testing” message.
    Use the Up Arrow button to select the “Clear Counters” menu.
    Press the right arrow button (the Menu button).
    Scroll through with the up/down arrows to select “Maint Tank”
    Select with the right arrow and execute with the right arrow
    Turn your printer off then turn it back on.

Tuesday, March 5, 2019

Filling and Refilling Epson T0781 T0786 refillable ink jet cartridges

Filling and Refilling Epson T0781 T0786 refillable ink jet cartridges

Our how-to guide shows the easy fill process of the T0781, T0782, T0783, T0784, T0785 & T0786 ink jet cartridges. Also covers information about the ARC (auto-reset chips) and refilling information.Instructions on Filling & Refilling Epson Compatible T781, T0782, T0783, T0784, T0785 & T0786 ink jet cartridges with ARC (auto-reset chips).

The refillable cartridges for T0781, T0782, T0783, T0784, T0785 & T0786 contain an auto-reset chip. Once ink level falls to a predetermined level the chip automatically resets to near full capacity.Cartridges have a 10+ml capacity per cartridge.
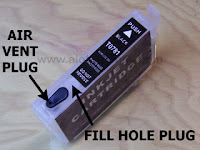
These cartridges are of a 2 plug design, but not pressure filled as previous 2P cartridges were.One plug is used as a fill hole while the other is a vent plug. The image on the right shows the two plug locations.

Filling & Refilling:

  • Remove clear rubber fill hole plug

  • Fill injector with desired color ink.

  • Insert injector needle into cartridge

  • Slowly inject ink. Make sure you do not push needle all the way to the hub (yellow plastic portion of needle.) Inject ink slowly

  • When completed injecting ink replace original clear fill hole plug.

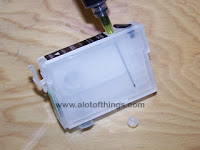
That is it. Cartridge has now been filled and is ready for use.Though the image to the right shows the cartridge laying on it side this is not recommended. It was taken this way to show the ink in the cartridge. Always keep cartridge upright.

Before attempting to use any cartridge make sure you have ALL cartridges filled.Cartridges do not work independently. The printer will show an error message of only one - five refillable cartridges are installed.

Replace any cartridges already in the printer with a complete set of refillable cartridges.
Once all cartridge have been inserted remove the vent hole plug from the cartridge.The vent hole plug is the color plug. On the image to the right the two leftmost cartridge plugs have been removed.

After removing all six plugs hit the ink cartridge button.Printer will begin to run an initial cartridge prime, the same as when any new cartridge is installed.After prime has been completed run a print test.

IMPORTANT INFORMATION

As with the OEM cartridges, refillable cartridges may not appear on the Epson Print Status window at all times. (image on right). If you open your printer properties window you can see the current status of the ink levels.(image on left of picture). This usually only occurs when running multiple print job without breaks in between.

Once a break in the print occurs your ink level will appear in the Print Status window once again.The ink level not appearing in the Status window is not an aftermarket related issue, but a printer related issue. This occurs on both OEM cartridges as well as aftermarket.

Never install less than 6 refillable cartridges at one time. Printer will not recognize the Epson cartridges when one of the refillable are installed.

Cartridge Chip auto-reset

These cartridges will reset automatically. There is no hitting cartridge change button or turning printer on and off required. Cartridge will all auto-reset at same time. It is advised that all cartridges be refilled at this time to prevent any cartridge running out of ink.Some cartridge may contain a good deal more ink than others depending on the first cartridge that requires reset. In most cases this is black. (under testing of 5 sets using of cartridges on 1 each R260, R380 & RX580).

Refilling

After initial fill when you are ready to refill return allplugs back to cartridge. Remove cartridges from printer and repeat fill process. There is no difference in refill from the initial fill.

Friday, March 1, 2019

no image

How to Reset Canon i255 and i320 Waste Ink Counter

Reset Methode for Canon Printers i255, i320

Step 1 : Manual for service mode
  1. Unplug power and USB.
  2. Open door and hold power button.
  3. Connect power.
  4. Close door, then release power button.
or try other step for manual service mode
  1. Turn off the printer. And disconnect the printer cable.
  2. Press and hold the POWER button, turn on the printer.
  3. The indicator LED should be green.
  4. Press and release the RESUME button , the indicator LED should be orange.
  5. Press and release the RESUME button again, the indicator LED should be green.
  6. Release both buttons.

Step 2 : Software for Permanent
  1. Reconnect the printer cable.
  2. Download and Run General Tools software resetter for Canon printers i320, i255 then
  3. Select USB PORT
  4. Choose SET DESTINATION 1 And it should be reset.
Remark “After service mode use software for permanent reset”

Thursday, February 28, 2019

no image

How to Reset Printer Canon MP360 Waste Ink Tank Full

Reset procedure for Canon MP360 MultiPASS printer. The following procedure is copied from fixyourownprinter forum . Some user tried the procedure to reset waste ink tanf full on Canon MP 360 and reset error #343 Canon MP360 MultiPASS printer and mentioned it works.

Short Review For Canon MultiPASS MP360

The Canon MultiPASS MP360 Desktop Photo Printer Copier and Scanner delivers exceptional performance and versatility to the home office. Print high-quality text and photos quickly copy documents and graphics and easily scan photos and other images – all with one compact machine.

By using high-intensity color inks and pigment-based black ink the MultiPASS MP360 can increase your satisfaction with printing and copying output. It even delivers borderless copies and photos. borderless prints perfect for framing or the scrapbook. Both scanning and copying quality are improved with the use of CCD color scanning technology and a maximum software enhanced resolution of 9600 dpi with 48-bit color depth. Print speed the Canon MultiPASS MP360 up to 18 ppm in black up to 12 ppm in color

Manual Reset Procedure To reset waste ink tank error and reset error code #343

Manual Reset procedure Waste Ink Tank for Canon MP390 and Canon MP360 Just Follow this step how to reset waste ink tank full :
  1. Start with printer on, press aadditional functions, Scan, Copy, Scan. Now you should be in service mode.
  2. Select Test mode which is like the last available selection
  3. Select #8 Printer Test, it will do something here like cleaning or something then it will come up with some other option this is where it gets a bit confusing cause now all it says is like 8-2 or 8-3 push the + or – button until it says 8-3 then hit the select button
  • The menu will now say EEPROM Clear
  • Select Ink count which is option (0) and press set
  • Then press Stop/Reset Followed by the power button and then wait for it to restart.

Wednesday, February 27, 2019

no image

Resetting Ink Counter Level on Canon Pixma iP1600

- the printer powered off but connected to a power source, press the Power button while pressing and holding
the Stop/ Reset button.
- When the Power is lit, press the Stop/Reset button two times while pressing and holding the Power button.
- When releasing the Power button and the Stop / Reset button (regardless of order), the printer will move into a
service mode. (Waiting for menu selection)
- When the on/off lights in green, press the Stop/Reset button the specified number of time(s) according to the
function listed in the table below.(Each time the Stop/Reset button is pressed, the LED lights alternately in
orange and green, starting with orange.)note: press 4 times for waste ink counter reset.

The number of the Reset button pressing
LED Function Remarks
0 time Green Power off
1 time Orange Service pattern print
2 times Green EEPROM print
3 times Orange EEPROM reset
4 times Green Waste ink counter reset
regards

Sunday, February 24, 2019

no image

Canon MPC190 Reset Waste Ink

Canon MPC190 ResetWaste Ink 1) Enter SERVICE MODE.
By pressing Menu, Copy, Scan,Copy,Copy
2) Select TEST MODE.
3) Select [8] PRINTER TEST in TEST MODE.
4) Select 3. [EEPROM CLEAR].
5) Select 0. [INK COUNT].
6) Press the [Set] key.
7) Press the [Stop/Reset] key (returningto the state of 3)), and then press the [ON/OFF]key.

Monday, February 18, 2019

no image

Canon i80 Waste Ink Tank Full

Try this to reset the error.

1) Close the print head cover, and turn off the printer. While pressing the Resume/Cancel button, press the Power button. (Do not release the buttons. The LED lights in green to indicate that a function is selectable.)

2) While holding the Power button, release the Resume/Cancel button. (Do not release the Power button.)

3) While holding the Power button, press the Resume/Cancel button three times, and then release the Power and Resume/Cancel buttons. (Each time the Resume/Cancel button is pressed, the LED lights alternately in either orange or green, starting with orange.) During initialization, the LED blinks in green.

4) When the LED stops blinking and lights in green, press the Resume/Cancel button the 4 times. (Each time the Resume/Cancel button is pressed, the LED lights alternately in either orange or green, starting with orange.)

5) Press the Power button. The LED lights in green, and the
selected function is performed. (When the operation completes, the printer returns to the menu selection mode automatically.)

6) Power off then back on and test.

Sunday, February 17, 2019

no image

How to Reset Ink Level Cartridges PG 40 and CL 41 in Canon Pixma iP 1880

When refilling ink of cartridge PG-40 and CL-41 at Canon Printer Pixma iP 1880, ink level at cartridge do not become automatic full, but we have to do reset manual otherwise you change new PG-40 and CL-41 cartridges, you needn’t reset the cartridges.

There are some ways to reset of type Canon printers cartridge PG-40 and CL-41, one of the way to reset ink level cartridges PG-40 and CL-41, shall be as follows. Before you do reset you have to provide one of Canon Printers Cartridge PG-40 and CL-41 again.

Resetting level ink :
  1. Tide of Cartridge Canon PG-40 and CL-41 (2nd) to Canon Printer Pixma iP1880 and let the cartridge detect untill finish. And try to test print.
  2. After refill of cartidge canon PG-40 and CL-41 (1st), tide the cartidge PG-40 and CL-41 (1st) at printer and try test print again, usually the ink level status have full again. Otherwise succeed to try again.
Note :
Let easierly of first Canon Cartridges PG-40 and CL-41 i give the name (1st), and other Canon Cartidges PG-40 and CL-41 I give name (2nd).

Tuesday, February 12, 2019

no image

Reset the Chip on CLI 8BK Ink Cartridge

Doomed Canon pic cartridges are outfitted with a semiconductor that lets the printer and Canon software on the machine mate if the ink pickup has amount straight from Canon or has been refilled. If the cartridge has been misused before, the machine instrument not win until a new Ravine impress cartridge is installed. To prevent money, whatsoever group either fill create cartridges themselves or they buy refilled cartridges online. There is a way to reset the semiconductor for a CLi-8BK Ravine ink cartridge so it instrument apply in the printer

Resetting the Divide

1. Acquire a Ravine fleck resetter, which is gettable through several online ink cartridge fill stores.
2. Withdraw the refilled or aftermarket Canon CLi-8BK cartridge from its packaging.
3. Piazza the ink pickup on the mar resetter. Urinate sure the blemish end on the soil of the cartridge is pressed up against the resetters pins to excrete a shape.
4. Wait for the LED morals on the ink cartridge to suppress erst, then thin up solidly. This agency the muck on the ink cartridge has been adjust and it give now pass in the printer.
5. Slip on the printer and agape the reach entrance. Take the old cartridge and put the new pickup. Closely the machine entrance and commence using the machine

Monday, February 11, 2019

no image

Canon i320 i255 Waste Ink Counter Reset

Canon i320, i255 Waste Ink Counter Reset.
Step 1 : Manual for service mode
1. Unplug power and USB.
2. Open door and hold power button.
3. Connect power.
4. Close door, then release power button.or
Step 1: Manual for service mode
1. Turn off the printer. And disconnect the printer cable.
2. Press and hold the POWER button, turn on the printer.
3. The indicator (L.E.D.) should be green.
4. Press and release the RESUME button , the indicator (L.E.D.) should be orange.
5. Press and release the RESUME button again, the indicator (L.E.D.) should be green.
6. Release both buttons.

Step 2 : Softwarefor Permanent
1. Reconnect the printer cable.
2. OpenGeneral Tools software and select (USB PORT)
3 .Choose (SET DESTINATION 1) And it should be reset.
Remark"After service mode Pls use software for permanent reset"

Friday, February 8, 2019

Reset Waste Ink Canon i320 and i255

Reset Waste Ink Canon i320 and i255

https://blogger.googleusercontent.com/img/b/R29vZ2xl/AVvXsEjGFA9m2C_oT9ZcBA4JXlv2hD6QGvepPHe5jtaYGR80GCvOOsnQB0XMDBGHNNzrZRcsDprnOJyeYNZmqH91WNQZwKpT_m6aaDdb6E9OoKHipLGPKT_-xGYtBD6DSuwsdtcgGUrla_2AAP4/s320/Canon+i320.jpgStep 1
Manual Temporary

1. Unplug power and USBOpen door and hold power buttonConnect power
2. Close door, then release power button.

or Step

1. Turn off the printer. And disconnect the printer cable
2. Press and hold the POWER button, turn on the printer
3. The indicator (L.E.D.) should be green
4. Press and release the RESUME button , the indicator (L.E.D.) should be orange
5. Press and release the RESUME button again, the indicator (L.E.D.) should be green
6. Release both buttons.

Step 2 Software for Permanant

1. Reconnect the printer cable.
2. Open General Tools software and select (USB PORT)
3. Choose (SET DESTINATION 1) And it should be reset.

Remark “After service mode Pls use software